

How To Put Up Ceramic Backsplash
 Ceramic Tile Backsplash Choices & Installation
How to select & install a ceramic tile backsplash
- POST a QUESTION or COMMENT virtually choosing & installing ceramic tile
InspectAPedia tolerates no conflicts of interest. Nosotros take no relationship with advertisers, products, or services discussed at this website.
Ceramic tile backsplash installation above a kitchen or bathroom countertop is explained here.
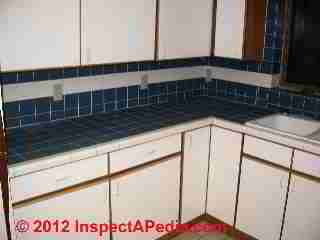
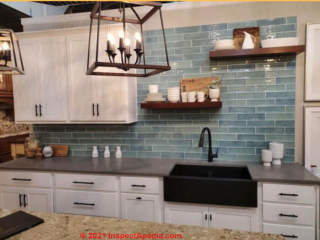
Page top photo: a blue and white ceramic tile countertop and backsplash installed by the website editor in the 1970s. Note the poor aesthetic design choice of a single white tile stripe that leaves the white receptacle covers intruding into the blue backsplash area. This is not a design suggested past Villalobos, the contributing author plant below - Ed.
This article series discusses ceramic flooring tile choices & backdrop, and ceramic tile installation details for kitchens and bathrooms.
We as well provide an Article Index for this topic, or you lot can try the page peak or bottom SEARCH BOX every bit a quick way to find data yous need.
Ceramic Tile Backsplash Installation Guide
 Leonardo Villalobos, Mosaic Tile Outlet, August 2022 + A. Church building / D. Friedman, January 2022
This article covers the importance of a kitchen backsplash installation, its construction, installation procedure, and and we provide some innovative backsplash ideas utilizing tile patterns, colors, materials, styles that have a pregnant impact on kitchen design and artful appearance.
[Click to overstate any epitome]
Popular Tile Options for a Designer Kitchen Backsplash
Every homeowner loves to brand the home aesthetically appealing, well-functioning, and welcoming space for the family and loved ones visiting the home.
The kitchen in every habitation serves as the 'energy heart' and information technology is the most visited part of the dwelling house.
A kitchen should have a well-designed backsplash, which can exist the focal point in the space. As y'all know, the walls backside the stove, sink, or oven, sustaining the splashes of oil, water, and more, are known equally the kitchen backsplashes.
Though many alternatives are bachelor today, tiling a kitchen backsplash has remained a popular style to beautify the backsplash. Let'south hash out some essential aspects of this installation and the trends that are ruling the hearts of most homeowners in recent years.
Why is Kitchen Backsplash Of import?
Deciding on the interior decor theme for the kitchen may be confusing, and still, it is very essential.
A kitchen backsplash is not only installed for protecting the wall backside the stove but too every bit of the most decorative elements in the kitchen. Without a proper backsplash, the wall behind the stove is likely to become greasy and soiled, and you may feel that something is missing in the room.
Because the kitchen backsplashes is a key component in the overall personality of a kitchen, interior designers try matching the tiles with other elements in the infinite, such equally paint on the walls, countertop, furnishing, storage cabinets, other wall decorations, and much more.
The color, pattern or shape, the terminate, and the way thing the most to create the aesthetic appeal yous desire. Mixing and matching these backdrop to attain an middle-catching elegance is also fun.
Do you lot want a modern outlook with glass tiles installed for the tile backsplash?
Or, are you a vintage admirer planning to comprehend the entire wall with a deco-patterned ceramic tile? Deciding on the interior decor theme for the kitchen may be confusing, and still, it is very essential.
Cull the Best Material for a Tile Backsplash
A tile backsplash should be easy to install, clean, await groovy, and last for years to come. All these technical aspects rely on the tile textile you cull.
Ideally, a backsplash installed with ceramic tiles, porcelain tiles, glass mosaic tiles, marble mosaic tiles, other natural stone tiles like slate, travertine, and metal mosaic tiles would have all the desired properties.
However, many other tile materials tin go well.
Below in this article at BACKSPLASH TILE ALTERNTIVES we show a collection of interior backsplash tiles that can help you lot explore the wide varieties of mosaic tiles used as backsplash cloth.
Design Features of a Kitchen Backsplash
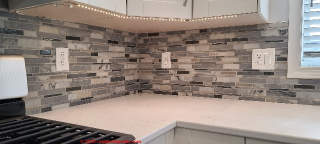
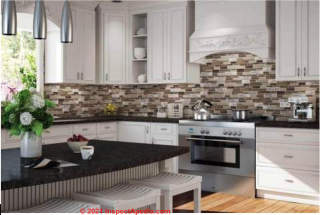
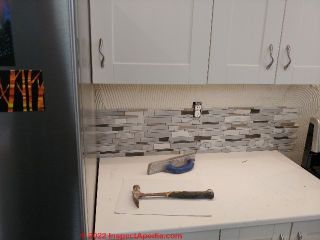
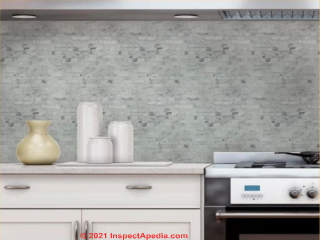
Photo above: horizontal gray-theme ceramic backsplash tiles installed in a home in Two Harbors, Minnesota. Below nosotros include pictures of the steps in installation of this backsplash.
The homeowners wanted the tile backsplash to extend from countertop surface to the underside of the overhead cabinets, making for both a cleaner design and a wall surface easier to go on clean.
While planning for a new kitchen backsplash installation or a kitchen renovation project, you demand to consider the following:
- Backsplash Extent in areas where no wall cabinets are present
- To bottom of windows over the countertop
- To the top of windows over a countertop
- To the ceiling in areas where no cabinets are mounted
- Continuous behind cooktop that might afterward be replaced or modified. In the photo to a higher place y'all can run into that the tile installer took care to continue the ceramic backsplash behind the current stove.
- The area you cover with backsplash tiles should complement the style yous are following for your kitchen decor.
- Utilize the most appropriate grout, adhesive, cement, and tools while installing the tiles. These factors ensure the durability of your installation.
At GROUT INSTALLATION, TILE Steve Bliss notes that the colour choice for countertop grout is of import equally is grout material where stain resistance is a business concern.
Tile Colour Choices: Harmony or Dissimilarity
Select the backsplash tiles considering creating harmony or contrast with other elements in your kitchen.
How to Install a Ceramic Tile Backsplash
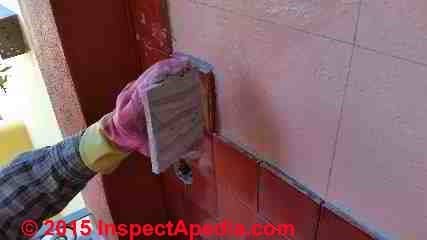
Photograph: Website editor [DF] installing a ceramic wall tile in Mexico. Details near this installation are at
WALL, CERAMIC TILE INSTALLATION
Nearly homeowners rent a professional renovation contractor or a tiling and grouting service provider.
However, if you are confident about your tile installation skills,and if you would enjoy installing your own tile backsplash, you can do and so.
The tile cloth and design are the two virtually essential aspects that derive the installation process. The pattern ideas demand a suitable design, and the durability of the tiles relies on the materials. Notwithstanding, the way you install the tiles also influences how long they remain on the wall.
10 Piece of cake Steps to Install a Kitchen Backsplash
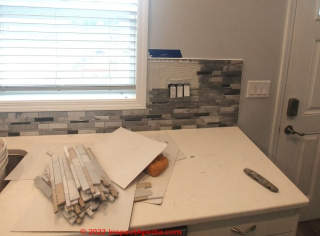
Below, in the Minnesota dwelling house where the tile backsplash will be installed the worker has put down protective covering over the countertop, sink, etc. and has removed the receptacle cover plates.

- Gear up the wall where the backsplash volition be installed
Clean the area to be tiled using a sponge and advisable cleaners, and let it dry thoroughly.
Be sure that there is no oil or grease on the surface to which y'all'll exist gluing up tile.
In preparing the backsplash area you'll need to remove the covers from electrical receptacles so that you tin can tile effectually those openings.
Watch out: to avert a serious, possibly fatal electric shock it'southward best to plow off electrical power to the receptacles in the backsplash expanse until the covers are dorsum on those devices.
Sentinel out: If you leave the electric receptacles and switches in place and and then tile over the electrical switch or receptacle mounting ears, a hereafter electrician or homeowner will curse your stupidity because yous've made it very difficult to remove and supervene upon an electrical receptacle or switch when needed subsequently-on.
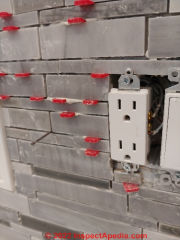
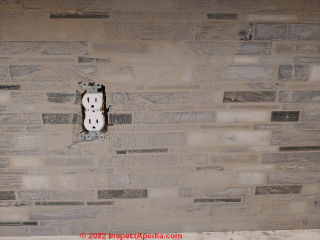
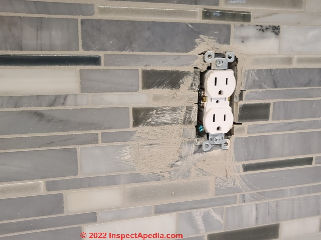
With electrical power off, we really remove the electrical receptacles and switches from the wall so that we can reinstall them with their mounting ears on top of the finished tile backsplash surface.
That lets the states tile shut to the electrical box without worrying that the opening edges won't be covered by the receptacle or switch cover.
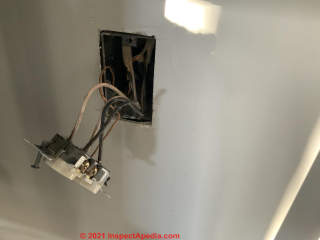
Above: an electric receptacle, with power off, is removed and left hanging out the wall so that we tin tile around the receptacle opening. Photo courtesy of InspectApedia reader Kirk.
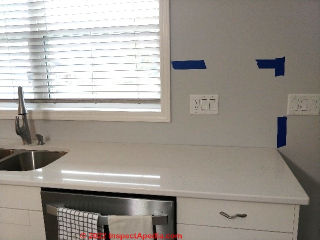
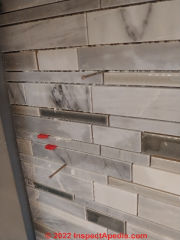
Photo above: the tile backsplash installer marked with blue tape the intended height and right-side ending terminus for the new backsplash.
The summit was called to match the height that the tile would attain elsewhere above the countertop where it would encounter the nether-side of kitchen cabinets.
- Mark whatever special tile layout pattern:
Outline the area using a pencil, as per the tile patterns yous select.
Measure or apply a trial tile layout along the countertop to see how much you lot need to trim from the starting and terminate backsplash tile course tiles at the backsplash correct and left ends.
Or for some kitchens, yous may elect to evidence a whole tile at one end of the backsplash and allow the odd tile appear but at the other end where it may be less visible.
Keep in mind that yous'll likewise need to cut and trim tiles effectually the receptacle and switch openings in the backsplash wall.
- Set the thin-set tile adhesive mastic and spread it using a notched trowel.
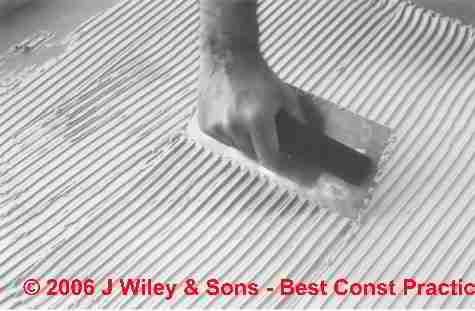
Higher up, using a notched trowel to spread sparse-set tile adhesive / mastic, described in more than-detail - image courtesy of Steven Bliss and J. Wiley & Sons, cited in item
at CERAMIC TILE SETTING COMPOUNDS
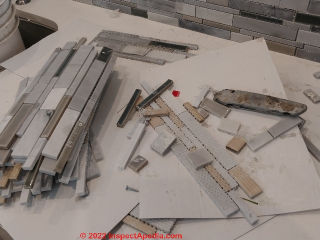
To a higher place: long narrow ceramic tiles used in this backsplash installation are sold pre-glued to a plastic mesh that makes tile spacing installation easier and faster. Nonetheless some tiles volition need to be cut effectually receptacles, switches, and possibly other locations.
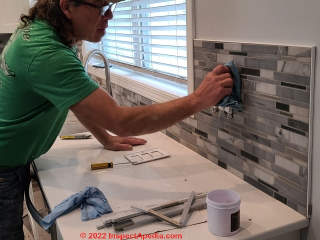
Below: The tile backsplash installer in a Minnesota home begins at the left stop of the countertop, placing tile onto agglutinative mastic.
Notation that the receptacle covers were removed and receptacles pulled out of the fashion just as in our photograph above.
- Install tiles from lesser to height, using spacers [shown above] to maintain a uniform gap betwixt tiles.
Tile spacers are sold in various thicknesses that you'd select to match your tile grout joint width. Typical and equally shown here are i/8" spacers equally sold at Abode Depot, Menards, Lowes, and other building suppliers.
Picket out: leave infinite for the flexible joint at backsplash to countertop surface;
Starting at the backsplash surface area-lesser, install you backer rod OR if you're not using a backer rod, remember to leave space (equal in width to your standard grout joint width) for the flexible sealant between countertop and backsplash bottom border by trimming legs off off of some of those tile spacers.
In the Minnesota home tile backsplash nosotros noted that the grout joints were rather small; the installer fabricated clever utilise of a combination of red plastic tile spacers and also elementary finishing nails to serve as boosted spacers where needed to keep the grout joints uniform.
 ...
... 

- Allow the tile adhesive set for a minimum of 24 hours.
|
And then remove the tile spacers and if necessary, clean out the grout joints.Sentry out: before applying grout to the joints, remove any excess tile mastic adhesive that extends close to the surface of the tiles. Otherwise those high points will forbid grout from filling the tile joint properly. Piece of work carefully then as not to disturb or flake the edge of the tiles themselves.
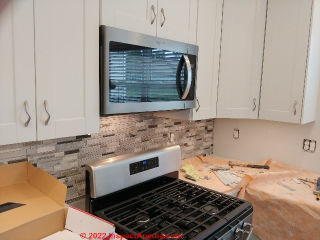
Above: to go along the ceramic tile backsplash behind the stove, where at that place is no countertop to back up the offset tile course, the tile installer uses a temporary brace ready onto the wall. One time the mastic adhesive has set this horizontal back up can be removed.
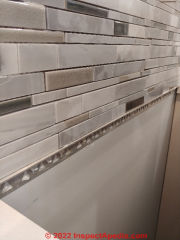
Above: where the backsplash ends in an open up area, the installer includes a suitable border of marble or like material.
Higher up: the tile grout has been practical in a first laissez passer; click to enlarge the epitome and notice the marks showing the direction of grout sponge movement: generally "beyond" the grout joints to avoid wiping out too much grout before it has set.
- Prepare & apply the tile grout
Sentry out: before grouting the tile backsplash, don't forget to utilize a flexible sealant for that beginning horizontal grout joint between the bottom of the tile backsplash and the countertop surface.
When buying tile grout most suppliers can provide a color and texture-matched flexible sealant needed in each tile right-angle articulation such equally betwixt the countertop surface and the bottom of the backsplash surface or at wall-to-chiffonier vertical butt joints.}
If you make full this joint first you won't find yourself later trying to gouge out grout where the sealant needs to be applied.
Watch out: choose a grout of appropriate fabric and color to minimize futurity staining on the backsplash
"Using a latex modified grout and sealing the grout will assist just will not preclude stains altogether. The all-time solution is to apply an epoxy grout and to choose a dark or neutral grout color such every bit greyness."
- Steven ElationFollow the grout manufacturer'south instructions, including, every bit y'all may read, letting some grout products "residue" for a time before you try to spread the grout into the tile joints.
Spread the into the tile joints using a spatula or spreader to wipe the grout into place.
Ensure you fill all the gaps. Go out the grout a bit high in the joints, every bit you're going to remove some of it in the next stride.
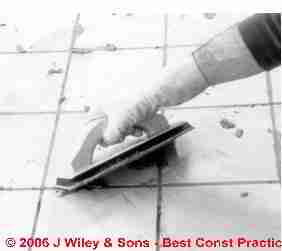
In a higher place, courtesy of Steven Elation in All-time Construction Practices, & J. Wiley & Sons, showing tile grout application using a condom trowel, cited in detail
at GROUT INSTALLATION, TILE - details of how to apply tile grout.
- Remove backlog grout using a clammy (non soaking wet) sponge and permit the tile grout set - how long?
Typically minutes to an hour or more - follow the manufacturer's instructions.
- Wipe off most of the grout from the tile surfaces once information technology has set in the grout joints but earlier it has hardened.
Watch out: Wipe diagonally across the grout joint to avoid removing besides much grout from the joints.
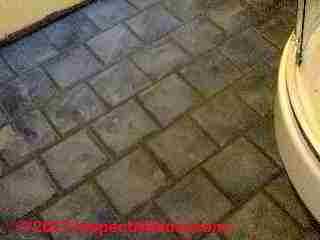
Photo in a higher place: we have spread the grout into these tile joints (in this instance a bathroom flooring) and have made a very lite commencement-laissez passer wipe off of backlog grout.
Detect the grout haze forming on the tile surfaces?
- Cease wiping off the grout afterwards it has set up:
When the grout has set, use a soft damp cloth to wipe off grout brume from the tile surfaces
Picket out: if you wait likewise long to wipe off the grout haze it can set iron-hard and exist very difficult to remove.
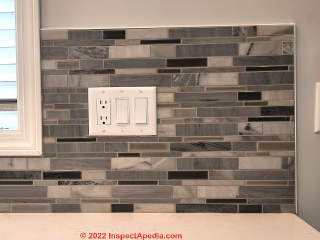
- Supplant the electrical switch and receptacle covers, using electrical box spaces of an advisable thickness, and call up to restore power to the receptacle and lighting circuit.
Lookout out: After the tile is installed and before yous supervene upon the electrical receptacle and switch covers you may need to install gap filler wall plates of an appropriate depth - spacer gaskets - to comply with both safety and the electric code.
These spacer gaskets bring out the face of the electrical box to flush with the face of the tile backerboard.
For example if the combination of tile mastic and tile thickness brings the face of the wall frontwards past 3/xvi" and if the face of the electrical box was originally recessed into the wall by ane/16", you'd purchase 1/4" thick electrical box spacers.

More Kitchen Backsplash Design Ideas
Hither are some creative backsplash ideas you tin consider when you tile backsplash for adding glamour to the space.
Subway Tiles: Timeless Trend
Subway tile is a traditional tile design derived from vintage subways. The brick-like structure can exist attained by installing tiles with an commencement of half of the width from the neighboring tile row. Nonetheless, many varieties of subway tile help you lot add a touch of modern elegance to your tile backsplash.
If you are fond of that vintage fashion argument, the backsplash ideas using subway tile horizontally or vertically or with a moving ridge design volition help y'all.
Subway tile is indeed a timeless tendency, every bit it is prevalent even when the technology for manufacturing mosaic tiles is advancing.
Natural Stone Tile Backsplash for an Eye-Communicable Aureola
Implementing natural stone mosaic tiles, including slate, travertine, marble, or installing peel and stick tiles that look like whatever natural rock remains a popular manner to make your backsplash a focal point in the kitchen.
You tin can choose appropriate colors and patterns in natural stone mosaics to beautify your backsplash.
Backsplash Ideas for an All-White Kitchen
Implementing white subway tiles or any other tile blueprint in white color combines archetype and modern mode.
Marble is, of course, amid the most popular tile materials to add that relaxed, simple, yet beautiful style to your room.
Your ceiling, countertop, storage cabinets, and furnishing can be maintained white or with the texture and appearance of some natural material like woods.
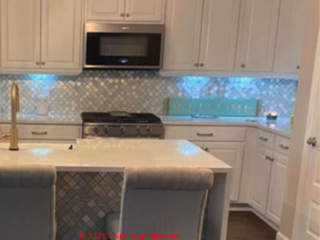
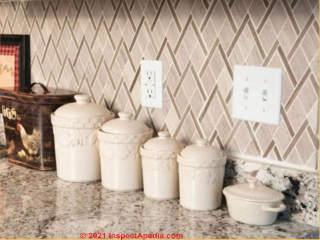
Geometric Tile Patterns to Enhance the Appeal
If you lot wish to beautify the backsplash wall with some intricate design, with a assuming appeal or a dissimilarity with the countertop, you can choose different geometric patterned tiles, like herringbone, chevron, hexagon, and more than.
Patterns like puzzles, pebbles, penny rounds, with texture and finish similar wood grain, would also look marvelous on the kitchen backsplash.
Hexagon Tile Backsplash
The hexagon tile blueprint is perfect for a bold and intricate look with dissimilarity. You can also choose marble hexagon tiles for an all-white room. The grout lines and bold colors, such equally metallic gray, blackness, green, and blue, add exciting appeal to the backsplash for sure.
Herringbone Design Kitchen Backsplash Tiles
Herringbone is among the tile shapes used for walls, backsplashes, and even floors.
Feel free to select low-cal or night colors to become well with the rustic design theme.
Even the neutral color makes your kitchen an interesting and heady combination of stylish decor elements.
Chevron Pattern Backsplash Tiles
Chevron is another pop tile pattern for the catchy elegance it creates. Though information technology looks similar to the herringbone blueprint, the difference lies in the fashion tile edges encounter.
You can create a fun element and a rustic style by implementing this tile pattern for your next kitchen tile backsplash installation.
Other Kitchen Backsplash Ideas
The wide-ranging tile materials, patterns, styles, finishes, and colors let you to explore backsplash ideas with novelty and unusual, off-beat kind of combinations.
Sentry out: have care to ensure the pattern thought doesn't look awkward and adds value to your entire space.
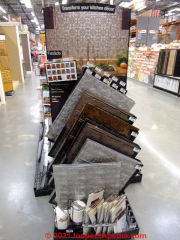
Peel-and-Stick or Glue-Up Tile or Panel Backsplash Options
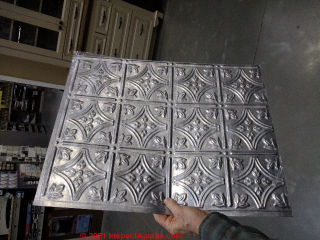
You can instead choose to install "pare-north-stick" for a kitchen backsplash, fugitive having to work with tile adhesive-mastic and in most installations, avoiding grouting the tile joints by butting the skin-and-stick tiles tightly-together. Or you can use a glue-up metallic or plastic panel like the one shown to a higher place.
Merely cut, peel, and stick the tiles ("pare-due north-stick") or apply construction adhesive (glue-up) to bond the tiles or panels to the wall surface.
This choice may appeal when y'all want to cover an already tiled surface, but proceed in mind that you'll take to re-mountain and bring forward the electrical receptacle covers already in the wall.
Above nosotros show a 3rd and similar alternative: a glue-up backsplash materials made of metallic or of thermoplastic panels (also used on ceilings to simulate antique pressed-tin) that are installed using construction adhesive.
In our Opinion these are an cheap, easy-to-apply alternative to a ceramic tile backsplash but one that is nowhere close in quality, durability, nor ease of cleaning.
Run into these instance
- GLUE-UP BACKSPLASH INSTALLATION INSTRUCTIONS [PDF] ACP Console Classic manner decorative thermoplastic panels, from CP POB 1581, Appleton WI 54912 USA, Tel: 800-434-3750.
Contributing authors
InspectAPedia.com provides building and environmental diagnostic and repair information to the public, without cost or fee. In order to absolutely clinch our readers that we write and study without bias we do not sell any products nor services, nor practice we have whatever business or financial relationships that could create such conflicts of interest.
- Brian's Tiles, a tile installer in Duluth, Minnesota, installed the ceramic tile backsplash whose photos appear in this article.
Contact Brian'south Tiles, LLC 218-343-8843 Email: bags6565@gmail.com Brian'due south Tiles, LLC tin can also exist establish on Facebook and by Google search.
- Leonardo Villalobos, Director of Commerce at MOSAIC TILE OUTLET [website] 2301 NW 84th Ave Ste B Miami, FL 33122 United states, Tel: 1-833-766-7242 Website: https://mosaictileoutlet.com/collections/swimming-puddle-tile or https://mosaictileoutlet.com
Mr. Villalobos has been involved in the manufacturing and marketing of mosaic tiles for over 20 years.
...
Go on reading at CERAMIC WALL TILE INSTALLATION or select a topic from the closely-related articles below, or see the consummate Article INDEX.
Or see these
Recommended Articles
- Bathroom & KITCHEN Pattern GUIDE - home
- Bathroom MOLD REMOVAL / PREVENTION
- CEMENT BACKERBOARD INSTALLATION
- CERAMIC TILE BACKSPLASH INSTALLATION
- CERAMIC TILE DAMAGE REPAIR
- CERAMIC TILE FLOOR & WALL
- CERAMIC TILE GROUT INSTALLATION
- CERAMIC TILE SETTING COMPOUNDS
- CERAMIC WALL TILE INSTALLATION
- COUNTERTOPS, KITCHEN & Bath - dwelling
- Floor TILE INSTALL on CONCRETE
- FLOOR TILE SEALERS, CERAMIC, Stone
- Flooring TILE SETTING COMPOUNDS
Suggested citation for this web page
CERAMIC TILE BACKSPLASH INSTALLATION at InspectApedia.com - online encyclopedia of building & environmental inspection, testing, diagnosis, repair, & problem prevention advice.
Or come across this
Alphabetize to RELATED Articles: Article INDEX to Building INTERIORS
Or utilise the SEARCH BOX constitute below to Ask a Question or Search InspectApedia
...
Ask a Question or Search InspectApedia
Questions & answers or comments nearly choosing & installing ceramic tile floors in kitchens & bathrooms
Try the search box just below, or if you prefer, post a question or comment in the Comments box below and we volition respond promptly.
Search the InspectApedia website
Note: appearance of your Comment beneath may be delayed: if your annotate contains an image, web link, or text that looks to the software as if it might exist a web link, your posting volition appear later it has been approved by a moderator. Apologies for the filibuster. Our Comment Box is provided by Countable Web Productions countable.ca
Technical Reviewers & References
Click to Show or Hide Citations & References
Source: https://inspectapedia.com/interiors/Ceramic-tile-backsplash-installation.php
0 Response to "How To Put Up Ceramic Backsplash"
Post a Comment